28 July 2014
IMPORTANT NOTE: Since this post was published SMIL animations have been deprecated and the animated demo will no longer work. I decided to leave it up though as the text along a path bit is still relevant.
I recently wrote a more general post on getting started using SVG text and wanted to follow-up with a slightly more advanced feature: SVG text along a path.
Inline SVG provides us with advanced customization options that are similar to capabilities of vector graphic software. Within the SVG code itself we can position text exactly as we want it to render on the screen.
In taking this manipulation even further, SVG <text> can be set to follow a given <path> element, and that text can then be animated to move along this path!
This post hopes to serve as a basic introduction to getting your SVG on a path and then get it moving via SMIL animations (animations written within the SVG code itself).
The textPath element is where all the magic of this feature resides. While SVG text would generally reside within a <text> element, it will now reside within a <textPath> element within the <text> element.
This <textPath> will then call on the chosen path’s id which is hanging out in a <defs> element waiting to be used.
The basic structure looks a little something like this:
<svg>
	<defs>
  			<path id="testPath" d="<....>"/>
  	  </defs>
    <text>
  		<textPath xlink:href="#testPath">Place text here</textPath>
    </text>
</svg>
Let’ s take a simple vector path and place some text on it.

After generating this path in vector graphic software the SVG code can be copied and placed within the <defs> element in the <svg> as shown in the code above.
See the Pen 1 by Joni Trythall (@jonitrythall) on CodePen.
The xlink:href attribute in a <textPath> allows us to reference the path to which the text will be rendered on.
The startOffset attribute represents a text offset length from the start of the path. A value of “0%” indicates the start point of the path, while “100%” indicates the end point.
The example below has a startOffset of “20%” which pushes the text to begin 20% in along the path. The font size has been decreased to prevent it from rendering out of the viewport when moved.
Color has been added to the stroke of the path to better demonstrate where the start and end points are in relation to the text.
See the Pen 2 by Joni Trythall (@jonitrythall) on CodePen.
The <animate> element allows us to select attributes and properties and then assign different values to them over a specified duration of time. By including this element in our <textPath> element we can directly select its attributes and apply animation details to them; the <animate> element must reside within the element to be animated.
There are a number of attributes that can be used within the <animate> element when building our animation details, but for this post we will focus on the following: attributeName, values, dur, repeatCount, and keyTimes.
This time we will use a slightly more interesting path and apply a simple SMIL animation that is focusing on moving the startOffset of the <textPath>.
Please note that the following demos only work as intended in Chrome and Safari. SMIL animations have no support in any version of IE and for some reason Firefox does not seem to render an SMIL animation on a textPath. Can contact me with any insight on Twitter.
See the Pen Animated text on path by Joni Trythall (@jonitrythall) on CodePen.
As mentioned, SMIL animations must reside within the element that is being animated, so in this case we are placing the <animate> element within the <textPath> element.
We are animating the startOffset specifically, so this becomes the value within attributeName, while values indicates a list of destinations for the target attribute; values replaces the need for to and from.
The attributes dur and repeatCount within the <animate> element specify the duration and number of iterations of the animation. Valid values for repeatCount are a numeric value or indefinite, which will repeat the animation for all of time.
Worth noting here is that if we desire the effect of what “forwards” does for CSS @keyframes animations we could use fill="freeze", which will freeze the animation at the last value instead of restarting.
While keyTimes is not required to initially get our text moving on the screen it allows for better control of the animation’s pacing. This is achieved through a list of semicolon separated time values.
The use of values, instead of to and from here enables us to match these values with the same number of keyTimes values.
Each time listed in keyTimes corresponds to a value in the values list and defines when the value should be used in the animation.
We can choose to have these values match for a smooth continuous movement as shown in the demo above, or specify that the animation play faster or slower at a certain point for example.
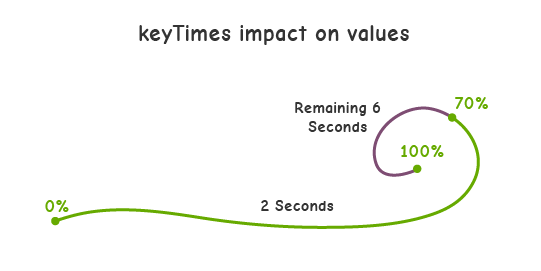
The set of values for the animation below are "0;.7;1" and keyTimes values of "0;.2;1", establishing that 20% into the timing of the animation it should be at the 70% point along the path.
See the Pen Animated text on path 2 by Joni Trythall (@jonitrythall) on CodePen.
There are many advanced features of SVG that allow us to get very creative in our manipulations and designs of these graphics. The behavior of text along a path, while seemingly complicated at first glance, quickly becomes more accessible when you begin to understand the basic behavior and structure of inline SVG.
In this post we reviewed an introduction to both the <textPath> and <animate> elements which hopefully gets you started using these advanced SVG features with little frustration.